Tuesdays' sneaky peek!
We were away this weekend for a well earned break on our boat, which we keep in Tarbert, Loch Fyne. The weather was good. Dry and pretty sunny all weekend........but it was a bit windy! Well, too windy to think about sailing with two wobbly small people! We just "caravan-ed it", didn't go sailing, hung out, rowed round the bay in the dingy, ate ice creams and sweeties and walked!
It's recharged my batteries after the battle to get my studio emptied and decorated and I'm raring to go!
I thought I'd show you what I'm working on at the moment and how I go about making a papercut.......
Here it is about 1/3 cut out, with a few more scribbles and "re-thinks"! I tend to keep revising the design right up until it's cut out, changing the position of leaves and where they connect, adding more hearts or birds......
It's recharged my batteries after the battle to get my studio emptied and decorated and I'm raring to go!
I thought I'd show you what I'm working on at the moment and how I go about making a papercut.......
 |
| Grow old with me papercut, initial design sketch. |
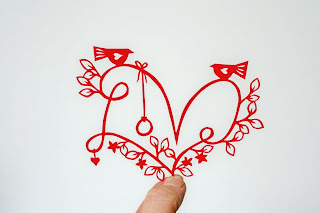
This is the initial design sketch for "Grow old with me", complete with a few "re-thinks"! I draw each leaf in outline only, not showing the detail that I'll cut out, and don't show the thickness of each branch.....mainly out of laziness!
 |
| Grow old with me, 1/3 cut out, right side.
|
 |
| Grow old with me, 1/3 cut out, wrong side. |
This is the back of the cut. It's much easier to see how it'll look without all my scrawls! I use white paper and draw the paper cut as it'll be seen, the right way round. Then after I've cut the whole picture out I spray paint it. Some other papercutting artists use coloured paper and draw the cut on the reverse of the paper, back to front.
 |
| New paint delivery! |
This is the range of colours that I'll use to paint the paper cuts on show for Perthshire Open Studios (note the chubby 11 month old hands desperately trying to pull the cans out of the box!)
thanks for sharing this, fantastic work
ReplyDeleteThank you!
DeleteWow!! Love seeing your process of cutting those intricate patterns! You must have the patience of a saint!! Such beautiful work you make.
ReplyDeleteThanks Lesley!
ReplyDelete